Below is a photo of the Gibson I owned in the 90s, a model E (the yellow one). It had the same two cylinder Wisconsin TF motor as my new Super D2 but was taller and wider, and had a row-crop tire configuration (I much prefer the Super D2 standard front end). The two John Deeres (1944 B and 1958 440IC) are also long gone, as I no longer live on five acres.
Back to the Super D2. Hydraulics didn't work, which the previous owner mentioned in his for-sale ad. The pump belt had been cut so the first order of business was to purchase a new belt. At least I got the cut belt with the tractor so I knew what size to buy.
Once the belt was installed, I tried the hydraulics. Yep, didn't work. The previous owner mentioned the problem was in the valve, so I delved into that first. All I can say is, it was a mess inside, put together wrong, cut o-rings, and, as I found out later, missing two vital parts. This next photo shows the spool with the cut o-rings:
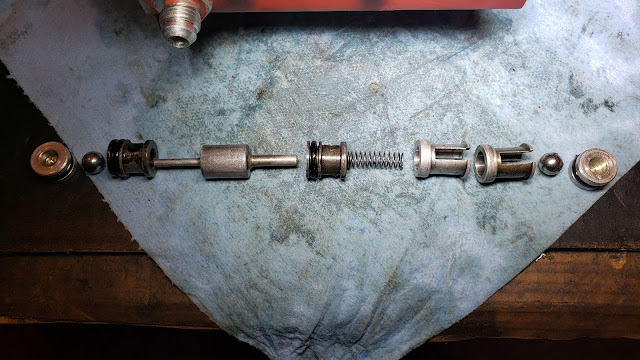
The next photo shows the internal parts in the order they came out of the valve body. The two check ball seats (my nomenclature, not sure of their real names) were facing the same direction, which seemed odd, there was only one spring (in the wrong place), and the two spacers were next to each other (I didn't know another spacer was missing at this point).
I really had no idea how the valve worked so I started with the parts I had and tried to figure out its operation. Finally, with the help of Microsoft Powerpoint (something I'd used extensively at work), I thought I figured it out.
The first order of business was to round up the missing parts. I deduced that I needed a check ball spring and long spacer (again, my nomenclature). I found a spring close in size in the basement (bottom of the two in the photo below).....
...... and made a long spacer on the lathe:
I put the valve together the way I thought it should go and reinstalled it. You know what? It actually worked.
The handle leaked quite a bit so that was the next project.
The crimp bolt was rather bent from being over-tightened. The non-flat surface of the handle didn't help.
A cotter pin was through the handle and pivot.
And then I found that a roll pin was also driven through the handle and pivot.
Here's the reason for the roll pin. The handle's splines were worn completely smooth.
The pivot has a brass lever that is set-screwed to the pivot shaft. As you can see below, the lever still has the set screw installed, and the set screw laying on top (same exact size) is one I actually found crossways in one of the valve's passages when I had it apart and was poking around trying to figure out the passageways. I wonder if that errant set screw has been in the valve since it left the factory.
All the parts are removed.
Ah-ha! A cut o-ring. Good, now I know there was something wrong and a new o-ring should fix it.
The pivot needed its o-ring groove scraped of ancient hardened goobers.
Next is a photo of the valve reinstalled in the tractor. I resorted to drawing the internal passageways on the valve when I was figuring out how it worked. The sheet metal hood covers the valve so I didn't bother removing the permanent marker lines.
Yay, no more leaks. Ok, that's a bit of a stretch for a 70-year-old tractor. No more hydraulic leaks from the valve is more accurate...


No comments:
Post a Comment