This tractor's rear wheel width is 74 inches, outside to outside. My little dump trailer is 72 inches in width between the sides. The more astute may see a problem there. I measured the wheel width before I bought the tractor, so I knew what I was getting myself into, although this job ended up being a huge endeavor. As I mentioned in the first blog posting of this tractor, the previous owner graciously offered to deliver the tractor to me, so I didn't have to do this painful job away from home. That would have been horrible, now that I know what it took to get the job done.
This first photo is of the left side. If you look closely at the nuts relative to the round opening, the nuts barely (if at all) have room to rotate, and there's a small lip that makes it so a socket can't get all the way onto the lug nuts. This may be a problem. [I later found out that this small inner lip is actually a register for the center splined hub to fit into - more on that later.]

This next photo is of the right side hub. For some reason, a piece of steel has been welded to the axle, I presume so the hub can't slide off. I wonder if this hub doesn't clamp tight on the axle. I'll find out when I do get to the right side.

Back to the left side. The first order of business was to get the get a collar loose from the hub. The collar and hub have a tapered interface. When the collar bolts are tightened, the collar taper forces the hub splines against the axle, which then keeps the hub from sliding on the axle. I loosened the three 3/4" collar bolts (1-1/16" socket and a 1/2" drive breaker bar). Normally the hub and collar are facing to the outside of the axle, and two of the three collar bolts can be threaded into some "jacking holes" in the collar to act as a sort-of puller to get the collar loose. With the hub facing inward and very close to the rear axle housing, that method couldn't be utilized. There are holes through the hub that allow a drift and hammer to be used to whack loose the collar, but that didn't work for me, so I drove in two tapered punches (seen in the photo below) and put heat to the collar, then beating the collar with the drift through the holes, but that also didn't work.


Now on to getting the six lug bolts and nuts removed. I'd mentioned that a socket could only fit halfway or a little more onto the exposed nuts. The bolt heads on the inner side of the wheel are square and there's not much access so I had to loosen the nuts from the outside. I heated the nuts red hot, then was able to get them to turn. I don't quite know what happened but three of the bolts' threads got stripped when removing the nuts, so I decided to just use the hot wrench (oxy-acetylene cutting torch) to remove the remaining three nuts.


This next sketch shows the proper orientation between hub and cast wheel. The hub is a tight fit into the hub register, so there is no vertical load being held by the bolts, although they do provide lateral support.

Whoever put the hubs to the inside (concave side) of the wheels didn't know about the locating register and put things together wrong. As mentioned, the entire weight of the rear of the tractor was basically hanging from the lug bolts because the hub wasn't properly located in the register of the cast wheel.
Below is the left side wheel and hub all back together. I had to buy six new Grade 5 bolts, nuts and lock washers for this side. Hopefully the right side will go smoother, although it is also put together incorrectly just like this side was.


The technique I used on the left side collar didn't work on the right side (using one jacking bolt and whacking the collar). I was able to dig up another bolt to use as a jacking bolt. I threaded it in and tightened it down a little, emphasis "little", then *snap*.... Great. That just made the job a lot more labor-intensive. Looking at the break, the bolt had been cracked previously in its life as part of the break was old.

My next move was to remove the wheel and tire from the hub. It took a while, as two of the wheel studs couldn't come out due to the hub collar still in place on the back side. The studs also had lock washers still on them that I couldn't get off because of the pesky hub register wedging the washers against the studs. I tried chiseling them out but to no avail.

With the wheel out of the way, I was able to really whack on the two wheel studs to get the collar unstuck.

Oh, and you might notice the small piece of scrap steel *welded* to the axle just outboard of the hub. Great... I'm guessing it was to keep the hub (and thus the wheel) from "walking" off the end of the axle. The hub collar had aluminum sheet shims between it and the hub, as the two mating parts had become so worn that without the shims, the collar wouldn't have tightened the hub to the axle when the collar was tightened down. When reassembling the parts, I made new and thicker shims out of sheet metal.

It's a bit difficult to shimmy a 400 pound wheel/tire assembly off the end of an axle when the wheel only has a small center hole with which to maneuver the tire back and forth. I also had to keep the wheel pretty much vertical or the weight of it would have overcome my ability to keep it upright.

Here's a photo of the large puller I used to get the hubs off.

Yep, down in that thar hole is a broken-off 3/4" bolt.


I figured the first attempt would be to drill a hole through the broken bolt, then employ the use of an Easy-Out. I know they rarely work but it's the easiest first option. Problem is, when you break off a 5/16" drill bit in the work, the job doesn't get any easier.

This first attempt didn't work. I then drilled out one end of the bolt to 1/2" diameter and welded up the inside of the hole, hoping that after the weld cooled, it would shrink the bolt enough to make it easier to get out. The bolt turned maybe 1/16 of a turn but then got tight again. For a brief moment I had hope.

So, more drilling, more welding, some acetylene torch heating, liberal penetrating oil, and finally I got the broken chunk to start moving ever so slightly. Hoping I wouldn't break off the Easy-Out, I worked the bolt back and forth for 20 minutes until it was out. That's about an inch and a half of thread engagement, along with rusty threads, but the Easy-Out prevailed. I don't know what the next step would have been if this method didn't work.


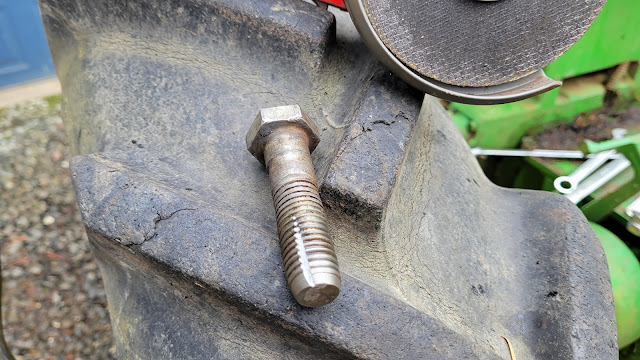
Now it's time to tackle the right rear wheel. I can hardly wait. The bolt below is the jacking bolt I used on the left side to help get the collar loose. Threading it into the right side collar didn't go so well, as the threads in the collar were worse off than the left side collar. I used a cutoff saw to slice a slot in the threads of the bolt so it would act as a sort-of tap to clean the internal threads. It did work somewhat.


Why, oh why, do I put myself through this aggravation? I may never know, but I guess it keeps me out of trouble. Another tractor on its way to being saved from parting out, or worse, rotting away into oblivion.


Maybe the next step is to pressure wash all the dirt and growth off. Summer's a-comin' and the tractor show is in June.
No comments:
Post a Comment