The gas tank on this tractor is filthy with rust and crud. It won't run more than a few minutes before the tank's outlet is silted over with junk, so it's time to take off the tank and do some deep cleaning. It's not as easy as it sounds though. The tank is bolted to the hood as a unit and the steering shaft also goes through the hood so the shaft has to come out. The steering wheel needs to come off to get the shaft out. A woodruff key is in the end of the steering shaft to key the shaft to the steering wheel. The woodruff key was so rusted in the shaft slot that I ended up shearing off the key with a hammer and cold chisel. Normally these woodruff keys slide out of their slots fairly easily.
In the midst of whacking away on the cold chisel, the hammer head flew off its handle so I had to fix that.
Yes, the below photo shows the sheared-off woodruff key. I'll need to figure out a way to get the embedded portion out of the slot. Not sure how I'll do that.
The front grill halves need to come off before the hood/tank can come off. There was a bit of debris packed away behind the grill halves. The dash panel with the gauges in it at the rear of the hood also had to come off. Its bolts threaded into nuts captured in sheet metal holders on the back side of the hood and two of the nuts spun in the holders. Vice grips helped in holding the nuts, but it was a very tight fit to get my hand and the pliers back behind the dash where they needed to be.
Oh, a bird's nest. At least it's March and no birds were in the nest yet.
Wiring from the generator runs above the gas tank so it had to be unhooked from the voltage regulator...
... and the dash gauges and switches.
I cannot believe how difficult JD made it to get the gas tank out.
I found a guy on Youtube (link here:
rust remover) that made his own rust remover solution from washing soda, citric acid powder, dish soap and water. We'll see how it works on this gas tank.
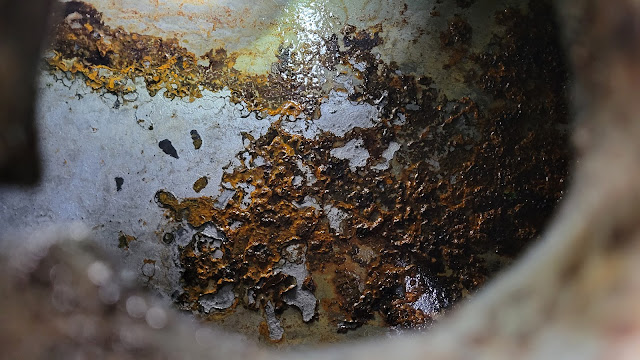
It's another day and time to try out the rust remover. First, a photo of the inside of the tank.
I mixed up two gallons of rust remover. To one gallon of water, I added 1-1/2 cups Citric Acid, 1/2 cup Washing Soda, and maybe a tablespoon or so of liquid dish soap to act as a surfactant. The mix bubbles up initially but then calms down.
Before dumping in the rust remover, I put a chain in the tank and sloshed water and dish soap around to knock off any big chunks.
This photo is after the chain. Not a whole lot of difference.
This next photo is after letting the rust remover sit in the tank for 30 minutes. Still not great but I'm going to call it good.
And now the arduous task of assembling everything.
These next two photos show the captured nuts that hold the dash piece onto the back end of the hood. They need a little work.
This next photo shows two of the "repaired" nut holders. Still not great but it's the best I could do with 75-year-old tin.
Ok, now to try and get the sheared-off woodruff key out of the steering shaft.
Being able to mount the shaft in the vise helped a lot, as it didn't take much to knock the key out.
I made do with the old woodruff key and just shimmed it up in the slot a little so it would work. There's not a lot of side force on the key so it should hold fine.
Once the gas tank job was done, I started up the tractor and the small oil leak on the side of the engine seemed to have gotten exponentially worse so I decided it was time to investigate. I cleaned off the area and found that the oil pressure adjuster plate was the culprit. That's good news, as I had previously thought it was the very large cover to the left of the plate that was leaking. That would have been a terribly big job. This, however, took me just half an hour to take off the plate, make a new gasket, and reinstall everything.
I took the tractor out for a little spin after getting things buttoned up. It ran great and didn't leave me stranded like it had in the past with the gunked up gas tank. No oil drips either. Maybe now it is time to do a little pressure washing to make it look just a little better.
Yet another day now. The generator isn't charging the battery so that was today's project. I pulled the cover off the regulator and it looked very clean.
I removed the generator and regulator from the tractor to work on it on the bench. Things seem fairly clean. I hooked a 6 volt battery to the Armature terminal of the generator and then grounded the generator body to the battery and the generator started spinning. That's an easy way to tell if the generator internals (rotor, stator, brushes) are in good working order. I then did a full field test of the generator using a drill motor and 15/16" socket to spin the generator. The way to do that is to ground the Field terminal and measure output on the Armature terminal. I got 9 volts. It must be the regulator that is the problem, so I removed it from the generator and took it to the basement laboratory.


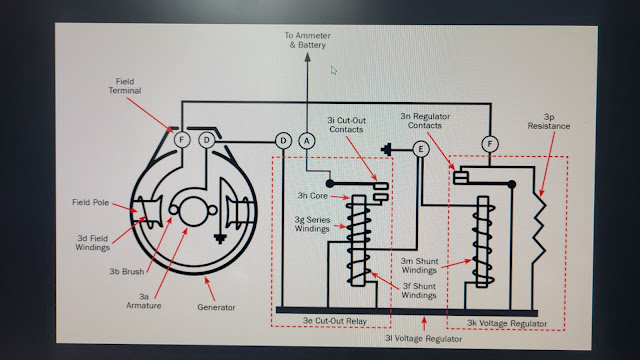
After doing some studying online, I found the drawing below. The field relay is on the right. It has a 22-ohm resistor across the points (the zig zag line on the right in the pic). I would read 22 ohms if the points were open or closed, meaning I was reading resistor resistance whether the points were closed or open. A good set of points would read 0 ohms when the points are closed, so I worked very hard to get the points clean (it took several cleanings to get the points working).
The generator is back on the tractor and working well. Glad there wasn't something seriously wrong with it.
After the generator project, I took a look at the rockshaft (3-point lift arms) to see if I could figure out why it wasn't working. John Deere calls the hydraulic lift system on this tractor "Powr Trol", and come to find out, it was just low on fluid (or empty). Surprise, surprise, the 3-point works now, but there's a leak. Why should I be surprised. It's an old tractor. Now to figure out how much has to come apart to fix that leak.
Fortunately, the seal that is leaking is encased in a little casting that unbolts from the back of the tractor with three bolts. First order of business is to drain out the gallon or so of hydraulic fluid I just put in. The drain plug for the Powr Trol unit is on the left side and under the pump. The plug looks like it drains the transmission but it doesn't.
It's hard to see in this photo below but there is a fill petcock almost right smack dab in the middle of this photo. If you want the hydraulic fluid to flow out faster when draining it, open up the petcock. It lets air into the cavity. Or just remove the filler plug.
The small casting is off the tractor. Now to get out the old seal and clean things up.
The seal it out but it put up a nasty fight. It may be original to the tractor.
Everyone online said to install two new seals, as they are different than the original. Put the first one in with the spring facing out, so the seal keeps air from being sucked into the system. Put the second seal in with the spring facing inward, to keep the hydraulic fluid from seeping out. Online instructions also said to put grease between the two seals so the outer seal has some lubrication, as it would otherwise be running dry and would destroy itself quickly.
It's all back together and topped off with oil. No more leak.
Oh yeah, I also put in a new ammeter. The old one was breaking apart.


No comments:
Post a Comment