My newly acquired tractor made it home yesterday afternoon. The person I got it from owns a tractor rental company and he kindly delivered the tractor to me on his mighty-nice roll-back hauler. It was a big rig to fit down my cramped driveway. As you may or may not have noticed, the Massey Harris Pony hasn't been unloaded from my dump trailer yet.
Sewing Machine Nut
Saturday, January 18, 2025
Monday, January 13, 2025
1957 Greenerd 3 Ton Arbor Press
When glancing through random online Craigslist/FB Marketplace ads, I occasionally run across something I need. Yes, you read that right, "need." This time probably wasn't one of those times, but this new addition is something I've wanted. It's a Greenerd 3-ton arbor press. What's an arbor press, you say? When these things were invented over 100 years ago, they were used to press arbors into things, like pulleys or whatever. An arbor is just a round rod like an axle or spindle, and it gets pressed into something like a hub or pulley. Thus the name "arbor press." You can probably guess these presses are used for a multitude of jobs besides just arbors.
Friday, January 3, 2025
1950 John Deere BN "High Clearance" and State of the Collection
The tractor situation is pretty normal. A week goes by and Yet Another Tractor (YAT) shows up at my doorstep. Ok so this one isn't exactly here yet but I have paid for it and the place that has it will deliver it in a few days. Incoming is a 1950 John Deere BN. The "N" in BN signifies a narrow front, also called High Clearance because it sits a little higher than a normal John Deere B. JD accomplished that by putting on larger wheels/tires. The regular B had 38 inch wheels in the back and the BN got 42 inch wheels (although 38 inch wheels were an option). The BN also got a single front wheel rather than the normal tricycle front with two close-together wheels.
Saturday, December 14, 2024
1951 Massey Harris Pony
I could go on and on about how I need to stop looking at want ads for tractors, but we all know how that goes. So, without further ado, may I present the newest addition to the herd, a 1951 Massey Harris Pony.
Wednesday, November 6, 2024
1943 Dodge WC51 Hood and Transfer Case Linkage Repairs
There's a central hinge on the hood of this truck. Each side can open up to work on that side of the engine bay. Problem is, the hinge pivot on the back edge of the hood had broken off at some point and the hood halves no longer stay propped up. It's no wonder the pivot broke, as it's just the end of the hinge sheet metal that had been formed into a round peg. Here's a photo of the front hinge pivot for context.
Tuesday, November 5, 2024
1943 Dodge WC51 Map Table
When first looking at this truck at the previous owner's place, he mentioned, "It even has a map table." He tried to pull out a piece of wood from under the glove compartment but it was stuck. Well isn't that cool though, I thought to myself. Once I finally did get the piece of wood to budge, I found out it was pressed board, so it was time to make a replacement. I found a piece of 3/4" pine in the basement and set about cutting it up into strips. I decided to make the strips two different widths just to make things interesting.
Monday, November 4, 2024
1943 Dodge WC51 Starter Pedal Repair
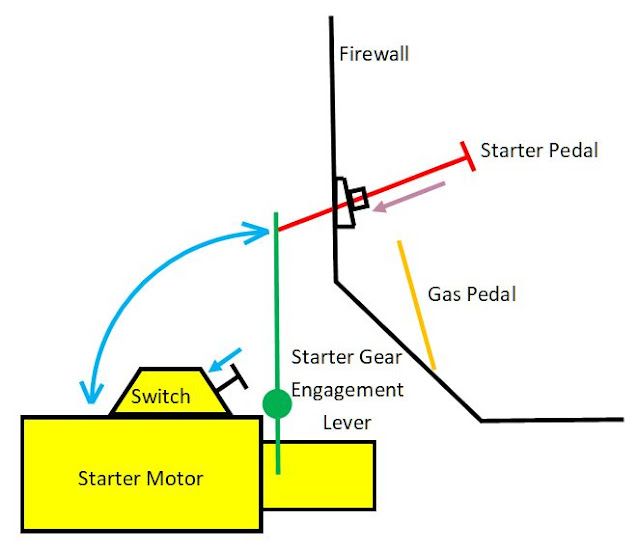
This truck has a unique starting system. You don't just turn the key to the start position and have the starter motor happily crank away. Oh, no. You push on a long rod or pedal with the tip of your right foot, press down firmly, and then the starter motor comes to life. With your foot on the pedal, it will take some coordination to use the heel of your foot to apply some throttle from the gas pedal while still pressing the starter pedal. It takes a bit of practice. The truck is supposed to have a manual throttle cable in the cab so as to allow application of some throttle without having to get your foot onto the gas pedal, but mine is missing. It's only $35 (!) to get a new throttle cable. Someday.
Wednesday, October 30, 2024
1943 Dodge WC51 Speedometer/Odometer Repair and Battery Tray
I really should work on something like the Farmall C that needs a lot more help than this truck does. I actually did move the Farmall off the lawn and into the garage today though (I'm sure to the delight of my wife), so it will be easier to work on it. I got a couple large bearings for the front pedestal so I might have enough parts to get the front wheel assembly put together and mounted on the tractor. That will make it so much easier to move it around in the shop. But enough of that, back to the truck.
The speedometer cable had been disconnected from the speedometer when I got this truck. I took a look at the end of the cable and the square drive piece was missing, like it had been twisted off. I felt up behind the dash and found the stub still in the speedometer. I tried to turn the spinny part of the speedometer (not sure what else to call it, the part that is driven by the cable) but it wouldn't budge, which is precisely why the square drive had been twisted off. I pulled the speedometer out of the dash and decided to delve into it. Without too much difficulty, I got the spinny part of the speedometer to turn so I chucked up the stub of square shaft from the cable into a drill motor and started things spinning. The speedometer worked but the odometer and trip meter did not.
Sunday, October 27, 2024
1943 Dodge WC-51 Repairs and Updates
A couple of weeks ago I was happily working on my "new" Farmall C kit (basket case, really) project, but then the brakes were put on it when this WC showed up out of the blue. Of course I had to do some fiddling with the new-new project, since the Farmall is merely an old-new project now. I got several things done today on the truck. The first thing I worked on was to oil the flapper doors on the little heater cube under the glove compartment. The heater isn't hooked up under the hood so I don't know if the heater core leaks, but I did get all the flappers working. Do you see it under the map table in the photo below? No? It is peaking out there. And that map table is made from particle board, so obviously it's not original. I'll make one from solid wood at some point.
Saturday, October 26, 2024
1942 License Plate Restoration
I picked up a vintage license plate on eBay for the 1943 Dodge WC51. The plate is 1942 and the truck is 1943. In Washington state, and many other states during WWII, steel was in short supply, so the normal yearly issuance of license plates was curtailed for 1943 and most of 1944. That means a 1942 license plate is correct for my truck. I was fortunate to find a plate specifically for a truck, as all other 1942 plates on eBay were for cars. In fact, doing an online search, I couldn't find a photo of any other 1942 Washington truck plates other than this one. These first two photos are the condition of the license plate I got. It's not ideal by any stretch of the imagination, but I think I can work with it.
Monday, September 30, 2024
1943 Dodge WC-51 Weapons Carrier
When will the madness stop? Ok, I know that looking on Craigslist and FB Marketplace were the downfall of my last two tractor purchases, but this new acquisition didn't happen because of my perusing the want ads. No, this deal was thanks to a fellow tractor club member. I guess I never should have joined that club. See where it's gotten me? Four tractors bought from club members, five if you count one that's been sold. And now I have me a Weapons Carrier.
What's that, you say? Weapons Carrier? Uh, is that legal to own? Yes, it is. And little did I ever think I needed or wanted one. But there's a story here. "Yes, of course there is," you say. Well, sit back and have a listen. So I have to go back four years. I joined the tractor club in 2020, right smack in the middle of Covid. I joined because I'd bought an aluminum can crusher powered by a 1917 2-1/2hp hit and miss engine. The gent I bought it from, Buck, said that the person who buys this can crusher should really be in the club, as it was kind of a mainstay of the club's shows. I told him, sure, I'll join, as I had a little Gibson tractor (yes, only one old tractor then) in the garage at home, and I was buying Buck's John Deere LA tractor also (another deal I couldn't pass up). I'd never been in a tractor club before. Should be fun. And now see where it's gotten me. But I digress.
Fast forward several years, and at one of the club shows, another member said to me he's always wanted a Gibson like mine. That planted the seed. I didn't have a real connection to the Gibson, so that thought of selling it to him began to percolate in the back of my mind. Fast forward to earlier this year (2024) and the same guy said he was going to sell his old WWII army truck. I innocently asked how much and he said, "I was thinking 35." Hmm, 35, 35... Thirty-five what? Hundred? Thousand? So I just had to ask, to which he said, "$3500". Wow, that seems cheap, I say to myself. I told him I was somewhat interested, and maybe we can work out a deal on my Gibson and cash. A little time went by and we came to an agreement. So now I'm down one Gibson and up one Weapons Carrier.
Sunday, September 29, 2024
1941 Ford 9N Tractor First Start
This blog posting is an update on the Ford 9N that came home with the Farmall C recently. I worked on this tractor for a few hours and got it running. There were a couple of things going on. First, the starter didn't work when I put in a battery. Second, once I'd removed, tinkered, and reinstalled the starter a couple of times and got it going, there was no spark. I read online that the easiest way to fiddle with the points in the distributor is to pull the distributor..... What?! Ok, I kind of get it, as the distributor on the 9N, 2N, and early 8N is mounted on the front end of the engine, under the water pump. Yeah, Ford did not have a better idea that day, and they realized it and put the distributor on the side of the later 8N's engine. It's hard to see in the photo below but the distributor is in there somewhere. Super fun to get to. Yep.
Monday, September 23, 2024
You Know You Have A Problem When.....
Umm, how do I begin. After previously lamenting how many tractors I have, I go and get two more. Two, you say? Yes, two. Really though, it's not my fault. I said no. I did. But then the seller did the dastardly deed and said those magic words, "Package Deal". I won't waste anymore time in words. Here's a photo. Ain't it a sight to behold?
Tuesday, September 10, 2024
1955 Ferguson TO-35 Body Work - Part 2
Today I finished the second side panel on the TO-35 hood. It was almost as enjoyable as the first one... It did take less time, but then getting things all put together was a lot more difficult than I would have expected, but I'm getting ahead of myself. This first photo is the right-side panel before doing any work to it. I wonder, is it sacrilege to use a John Deere tractor as a table for a Ferguson tractor part?
Friday, September 6, 2024
1955 Ferguson TO-35 Body Work - Part 1
Oh how I love doing automotive body work. Not. Give me a wrench any day. But ya gots to do what ya gots to do if you're too cheap to pay someone to do it, and the TO-35 hood's side panels need some attention. And it's about time. This poor tractor has been relegated to the "back 40", i.e., behind the garage, for way too long. And I just looked when I posted anything about it - a year ago. Ok, I didn't need to know that. But it's actually not as bad as it sounds. It was a whole two months ago that I did start working on the hood. I got it pulled off and disassembled. Then other things came up. Like more tractors, but I digress. So, here's the problem to tackle. Someone in the distant past used a hot wrench (oxy-acetylene torch) to hack off the bottom inch or so of the hood's side panels, I presume to mount a front end loader, and I am going to attempt to rectify that blunder.
Monday, September 2, 2024
1925 Economy Hit & Miss Engine Repairs/Tune-up and 1939 Turner Hay Press Tensioner Handle
A guy in my tractor club owns this 1925 Economy 1-3/4 hp hit & miss engine. It hasn't run right for a couple years now and at the recent county fair, we started smelling gas, and I speculated it might have a tank leak. I offered to take a look at the engine, brought it home after the fair and sure enough, the soldered outlet on the gas tank had failed. I pulled the tank and re-soldered the joint. Of course, to get the tank out, the wheels and wooden base had to come off. That meant enlisting the help of the engine hoist, as the engine is probably in the 300+ pound range.
Wednesday, August 28, 2024
1951 Baird Beaver's "New" Carburetor
Yeah, the quotes on the word "new" means it's not a new carburetor, but it's new to me. The carburetor that came on this tractor is a Stromberg UR-3/4, which in and of itself is something a little unique. Someone on the Baird Beaver forum took one look at a photo of it and said it was probably from the late 20's/early 30's. Wow, a 90-year-old carburetor. Here's a photo of the Stromberg. If you'll note the air intake of the Stromberg, it is facing directly at the muffler, so an air cleaner won't even fit on it. This carburetor also has a small intake manifold between it and the engine block, which isn't a stock piece for the Wisconsin AKN engine on a Beaver.
Monday, August 12, 2024
1936 John Deere BO Welding Fuel Cap Shields
The B "Orchard" tractor came from the factory with small shields for the air intake and the two fuel caps on the hood, so low-hanging tree branches had less of an opportunity to snag on stuff. My tractor's hood had the air intake shield but the two fuel cap shields were not on the hood, which doesn't make much sense, as the BO hood always had all three shields and the BR hood always had none. Fortunately two proper shields came with the tractor.
Today would be the day I either ruin the hood or come away with a finished product that looks somewhat decent. This first photo below shows the shields. They look like small air inlet scoops but the openings will be facing rearward. The openings are a little dented up so the first job is to try and straighten them.
Thursday, August 8, 2024
John Deere LA and BO Repairs
My 1941 JD LA has a battery but the only thing it is hooked to is the starter. Well, and the generator, but I'll get to that. The engine has a magneto so if I had a hand crank, I could start and run the tractor without a battery. The tractor did come from the factory with lights but the front one is currently missing and the rear one is not hooked up. The ammeter is also not hooked up, so yesterday (8/7) I remedied that. I wired up everything and installed a light switch. But it's not any ordinary light switch. Oh no no no no no. Let me explain.
Old tractors like this LA have a very rudimentary charging system. The generator has what's called a cut-out relay (not a voltage regulator), and its only job is to cut any voltage draw from the battery when the generator isn't charging, such as when the engine stops or the generator dies. Since the generator has the ability to put out 10 to 15 amps of current, with no regulator in the system it would boil a battery in short order if the engine ran, say, all day long.
Tractor manufacturers minimized excess current going to the battery by means of a resistor in the generator's field circuit, to lower output of the generator, and they decided to put the resistor on the light switch and they gave control of the resistor to the tractor operator. My LA's generator didn't have a light switch, and happened to be wired for full generator output all the time. Fortunately the engine doesn't run very well, so I think the battery isn't ruined....
The light switch has positions 1, 2, and 3. At the "1" position, the resistor is in the circuit so the generator puts out low current, maybe 4 or 5 amps. The "2" position takes the resistor out of the circuit so the generator puts out full power, maybe 10 to 15 amps. You'd use this if you were just running the tractor for a short time, so the battery could get recharged quickly. The "3" position turns the lights on, so whenever the lights are on, the generator is still putting out full power but some of it is powering the lights so the battery doesn't get full power..
Manufacturers in the mid- to latter-40s I believe started putting voltage regulators on tractors so the output from the generator was automated and more regulated than a system with only a cut-out relay and manually switched resistor.
I recently bought a resistor/light switch and installed it. This first photo is the switch I bought. The resistor sits on the top of the switch (white porcelain cylinder with resistor inside). There's also a fuse on the bottom to protect the light wiring.
Monday, July 22, 2024
1936 John Deere BO Radiator Curtain Fabrication
The very early model B tractors came with a canvas curtain on the front of the radiator to regulate airflow through the radiator. The main reason for this is because the cooling system didn't have a thermostat common to all internal combustion engines these days. This BO's engine is called "All-Fuel", and it runs on both gasoline and distillate (i.e., kerosene). You'd start the cold engine on gas from a small tank behind the main fuel tank, then when it was warmed up, you'd switch to distillate, which was a cheaper alternative to gasoline back then. Distillate needed a hot engine to burn well, and the curtain was the solution at the time. In order to get the engine to operating temperature quickly, the curtain would be pulled down over the radiator so the engine coolant would warm up quickly. There was then a roller at the top of the curtain to crank up the curtain to regulate coolant temperature. Later model John Deeres used steel shutters that were controlled by a rod back by the operator (then even later by thermostat), making it so the person didn't have to dismount the tractor to adjust the airflow. I don't know when shutters were discontinued but I'd guess sometime in the late 1950s, when they went to more conventional means of temperature control.
Today's project is to make a radiator curtain. My tractor fortunately came with most of the hardware. My previous 1937 BO didn't have this hardware. The main components for the curtain are a radiator guard (the mesh screen), upper curtain roller, lower curtain clips and spring, and guard spacers. I don't have the spacers so will need to make them, but they are just a standoff to hold the radiator guard 1/4" away from the radiator. Below are the components.
Friday, July 19, 2024
1941 John Deere Model LA New Acquisition
It's been how long since I bought a tractor? Six days? Yup. And I just bought another one? Yup. But there were extenuating circumstances. Really. I got in touch with the previous owner of the 1936 BO tractor I'd just bought last week to line up a time to pick up a few spare parts he had. He said to come on over. I did, and after he showed me the parts, I asked if I could see his other tractors. He's got only John Deeres, an AR, an LA, and a B. He said he really needed to get rid of the LA, and he said these grave words, "It would make a great parts tractor for someone." Huh? Parts tractor? It's way too nice to be a parts tractor. So I asked what he wanted for it. Five hundred bucks. Huh?.... I'll take it! So I went home, hooked up the trailer, and went back to pick it up.
Monday, July 15, 2024
1936 John Deere Model BO First Repairs
It never seems to take long for me to do some fiddling on a new-to-me tractor, even though I'm in the middle of fixing the hood on my Ferguson TO-35. That project has just got to wait, since I have a new favorite toy to play with.
Today's first job was to fix the clutch rod. Someone in the distant past thought it was a good idea to weld an iron pipe nipple onto the rod, I presume for strength. One big problem was that in doing so, they made the rod un-adjustable for length. They also welded the pipe to the cast steel clevis on the end of the rod. That's also not good. My job was to fix the mess... Oh yeah, and straighten the rod.
Friday, July 12, 2024
1936 John Deere Model BO New Acquisition
By now I should know not to go to tractor shows. They're dangerous. Yes, I bought yet another tractor today (7/12/2024). But it was a good deal. The gentleman I bought the tractor from was a co-worker of mine from way back in the 80s and 90s. I'd bought a 1950 John Deere BN with a front loader from him around 1994. That tractor is long gone but in the last few years I'd reconnected with the gent through a local tractor club I'd joined several years ago. Recently he had been making comments occasionally that he wanted to sell this tractor and I took note. Well, today was a tractor show and he had the tractor at the show. It had died shortly after he got it off the trailer at the show and it didn't want to start again. I jokingly asked what the broken-down tractor was going for today. He said, "$2,500 show special." Later he threw out some other numbers. Sometime in the afternoon I told him I'd like to buy his tractor, and he seemed surprised that I was actually interested. So the deal was made. I came back home and picked up my trailer, then drove back to get the tractor. I put 180 miles on my truck in the four trips down and back from the show. Here are the photos of the tractor.
Saturday, July 6, 2024
Sleep Number Bed FlexFit Smart Mattress Top Magnetic Cover Repair
Anyone who has one of these Sleep Number FlexFit Smart adjustable beds probably knows what this posting is about. The mattress cover has magnetic pucks that correspond to steel pucks fastened to the bed base. Since the base is adjustable, the mattress needs to somehow "adhere" to the base so it doesn't just slide around, so Sleep Number used these strong magnets embedded in the mattress cover to attach to the base pucks. Problem is, the mattress cover that the magnetic pucks are attached to is very flimsy, and over time the magnets pull out of the cover and leave gaping holes. I found multiple postings online of other folks having the same issue, and their recourse was to pay Sleep Number between $250 and $1000 to fix it. Sleep Number does not warranty this issue (shocking) and I'm cheap (also shocking), so I decided to try and fix the thing myself rather than buy a new mattress cover. Below is a photo of one of the blow-outs.
Thursday, July 4, 2024
1965 International 140 Headlight "Fix"
I put quotes around the word "fix" because it's not really something that is broken, but is more of a visual enhancement on the tractor. You see, when International Harvester came up with the goofy Model 1000 one-arm loader, they had to come up with a way to move the right front headlight out of the way of the loader lift cylinder and arm. They made a nifty bracket that moved the headlight in and up. Problem is, they only moved the right headlight, so the left headlight sits lower than the right one and it makes the tractor look even goofier than it normally does with its offset engine and one-arm loader. I think now would be an appropriate time to use the word cockeyed...
Tuesday, May 7, 2024
1949 Ferguson TO-20 Generator and Regulator Repair
I figured it was time I looked into the charging system on the tractor. It had a dead 6 volt battery in the compartment when I bought it so I was pretty certain the electrical system wasn't too far out of order. I pulled the generator and regulator off the tractor and took them to the bench. The generator didn't look too terribly bad in where the three brushes reside, but two of the three brush holders were stuck. A little oil freed them up. This first photo below shows the side with one brush. It's pretty clean in there.
Saturday, May 4, 2024
1949 Ferguson TO-20 First Wash in Decades
Ok, so it wasn't really a "wash". I used a pressure washer. The tractor is still wet in the 'after' photos but it did make quite a difference...
Thursday, April 18, 2024
2015 Lincoln MKC Front Wheel Bearing Replacement
This isn't something I usually write about but in this particular instance I would like to get down in words the supposedly simple task of replacing a front wheel bearing that went south in a spectacular way. Over the past several weeks/months I've noticed a noise coming from the front of the Lincoln that has every indication of worn front wheel bearings. Ok, now it's time to see how much of a job this is, so I visit YouTube to see how everyone does it. They make it look so easy. Off to the Jungle website to find replacement bearings and a nifty bearing puller/installer setup so I can do the job on the car. Mistake number one, don't buy wheel bearings from Amazon, but more on that later.
I started on the driver's side, no particular reason why. After removing the wheel/tire, the first order of business is to remove the brake caliper and hang it up and out of the way. Next is the axle nut. It's tight. Very tight. A pipe on a couple wheel studs and a 24" breaker bar on the nut is what it took to remove it. The rotor can also come off now, along with the dust shield on the back side of the rotor.
Monday, March 18, 2024
1985 Cushman Truckster New Brake Master Cylinder
I bought this Cushman May of 2022 and it has had a brake master cylinder leak for who-knows-how-long, certainly years before I got it. I figured it was time to fix it. Needing to move the beast to the garage, the engine did not want to start. I cleaned the points. I checked the spark at a plug wire. I made sure the fuel pump was pumping. I cleaned the points again. I bypassed the coil resistor. I checked for voltage to the coils. I put in more gas. I checked the points again, and yep, still a spark. Then out of the blue, the thing started up. Who knows what the problem was. But during that time of troubleshooting, I had to push the Cush out of its hole in the shed, and in doing so, I noticed one of the dump bed hinges seemed a bit off. Ok, add that to the list of things to do today. Once I got the engine running, I drove to the front of the garage and lifted the dump bed. Yep, that is a broken hinge.
Thursday, February 22, 2024
Starting Work on the "Lawn Ornament" 1949 Ferguson TO-20 and First Start
With the 1958 Ferguson TO-35 back together, running, and moved out of the garage, there was a big hole just waiting to be filled, so I pulled the TO-20 lawn ornament in to begin the task of getting it running after who-knows-how-many-years of sitting neglectedly (is that a word?). Well actually I didn't pull the tractor in, my wife and I pushed it into the garage, as, you know, it doesn't run.
Tuesday, December 26, 2023
Epos Triple Date Moon Phase Chronograph, Valjoux 7751 Movement, Minor Adjustment
I don't do much tinkering with watches anymore since I have Familial (or Essential) Tremor. As the name implies, it causes shaky hands and is passed down from parent to child. Lucky me. Anyway, this Epos watch was bought in 1999 (for a whopping sum at the time of $697) after we'd paid off our house loan. It was a time to celebrate and my wife and I each decided to splurge on something nice. This is what I chose to buy. It had been having minute-counter issues for a number of years. When the chronograph was started, the central seconds hand would go round-and-round as it should but the minute counter would haphazardly either count or not count up the minutes (and since the hour counter was tied to the minute counter, its movement was also intermittent).
I didn't wear the watch much lately because I'd gotten other nicer watches over the years but I pulled the Epos out a few days ago to wear it. That's when I decided to try and fix the problem. It is not a small task to delve into an automatic chronograph movement, and it is compounded immensely by both shaky hands and the fact that this chronograph is additionally complicated with a 24-hour pointer, triple-date (day/date/month) functions and moon phase. I'd watched several videos on YouTube prior to taking the plunge, so I figured I knew pretty much what the problem was and how deep into the watch's bowels I had to go.
Monday, December 18, 2023
Old Barracuda's Old Wiring Woes
I hopped in the '66 Barracuda Formula S at church one night in the dark after instrument practice and something strange happened. I turned on the headlights and very soon after I started driving, the dash lights went out and the under-dash "map" light came on. As an added bonus, the two C-pillar dome lights no longer worked, as I'd found out since I was fiddling with the headlight dimmer switch to try and get the map light to go off. Get this, all three map/dome lights are controlled by the headlight switch - it makes no sense why one light would be on steady and the other two won't turn on. I figured it wasn't a big deal to drive home with no dash lights, and they did actually come on (and the map light went out) about halfway home.
Everything's fine, right? Apparently not. When I got home my brother texted me and said he saw no taillights or brake lights when I drove away from church. Hmm. Well at least they probably came back on when the lights "fixed" themselves on the way home. So, today I started digging into the 58-year-old dash wiring (the car was built November 1965). I wasn't sure what would cause this issue, so I started at the headlight switch. The easiest way to get to it was to pull the instrument cluster. It's not a terrible job but it isn't trivial. The steering column also had to be lowered to get the dash out.
Sunday, November 26, 2023
,,, And Then There Were Nine ...
It happened sooner than I expected. In fact, I hadn't expected this to happen at all. I brought home another tractor. And this one is a real doozie. It's a 1949 Ferguson TO-20. Rather than try to explain what I bought, here's a photo from the seller's ad on Craigslist. I know, it's a real peach.
Monday, October 30, 2023
1965 International 140 Industrial Tractor First Repairs
10/30/2023
As good as this tractor looks and runs, it still needs repairs right off the bat. Two issues that I found today are a non-operational hour meter and a broken seat track. The hour meter comes first.
Sunday, October 29, 2023
1965 International 140 Industrial Tractor with a Model 1000 One-Arm Loader
How many days has it been since I lamented over buying yet another tractor? Um, thirty-three. Yep, I bought another tractor yesterday. Uh-huh. But I couldn't pass up this one. It was just too quirky. Here, have a look for yourself.
Saturday, September 30, 2023
1951 Baird Beaver - New Front Tires and Implement Lift Repair
The front tires on this tractor are in sad shape. Holes in the sidewalls kept me from pumping them up very much. I ordered two new tri-rib tires off the net and today is the day to install them. With the wheels being a two piece design. I thought it would be a simple matter of removing the bolts, splitting the halves, and getting the new tires on. Nope. Firstly, the bolts fought me the whole way. One problem is, the head side of the bolts (screws?) have a slot for a screwdriver, so I couldn't use a wrench on that side. Secondly, the nuts were so tight on the threads that even with a vice-grip clamped to the screw heads I barely got the nuts off with an impact driver (I actually broke an adapter too). Once the bolts were removed and the old tires were off, I noticed both wheels had rust holes. Bummer.
Monday, September 18, 2023
1955 Ferguson TO-35 Hydraulic Pump Installation and Other Maintenance
I didn't end up disassembling the hydraulic pump like I'd planned. It didn't really seem to need it after looking things over. I cleaned up the outside, made sure the control valve was free, installed a new relief valve, then slapped it back in the tractor. Prior to doing that though, I got sick and didn't feel like doing much of anything. I did manage to install a choke knob.....
Sunday, September 10, 2023
1951 Baird Beaver Garden Tractor
Joining a tractor club has its benefits. It also has a downside. Namely, tractor club members usually have excess tractors taking up space at their residences. To that end, I bought two tractors in two consecutive days, from two tractor club members. I've posted about the Ferguson TO-35 but not about my new 1951 Baird Beaver. Just look at this cute little thing. The funky piece of steel poking out the front of the tractor is for a blade, which unfortunately didn't come with the tractor.
Saturday, September 9, 2023
1955 Ferguson TO-35 Hydraulic Pump Removal
Ok, it's not as bad as you might think. It took me less than two hours from start to finish. Rachel Gingell on Youtube has a video about taking the pump out of a Ferguson 35, and that is what I basically followed. This first photo is of the fairly unmolested tractor before its guts were yanked out...
Tuesday, September 5, 2023
1955 Ferguson TO-35 Comes To Life
Yes, the new tractor project lives. In the last entry I mentioned that the carburetor was not installed when I purchased the tractor. Not knowing its condition, I proceeded to take it apart. It was clean inside but some bits were not tight, so I just put the thing back together and tightened up anything that was loose, then installed it on the tractor. I didn't feel comfortable putting gas in the tank yet since it hadn't been cleaned, so I just squirted some gas into the carb inlet, hooked up a battery, and let 'er rip. Here's a video of the process:
Monday, September 4, 2023
Wednesday, August 16, 2023
Rummage Sale Finds - Three Multimeters, Triplett and Fluke
I ran across a church rummage sale a few days ago down in the Portland, OR area and spotted some old multimeters in the sea of stuff. A Triplett and two Flukes. I figured they wouldn't work but decided to get them anyway, just because they looked cool. This first photo is of the Triplett, a model 630-NA Type 4.
Tuesday, August 15, 2023
Dad's 1940's Stanley Bailey Type 17 No. 5 Hand Plane
I'm working on a slab of Maple for a project and I needed to plane some raised parts down. I grabbed my small Stanley plane that I got at a garage sale eons ago and went to town. Hmm, the cutting blade wouldn't adjust very well and chips weren't coming off nicely, so I took the plane apart and figured I'd put the plane parts together wrong in the distant past. The blade bevel should go down and I'd had it facing up, so I turned it around and put the plane back together. It worked much better now. But then that got me thinking of Dad's plane I inherited from him years ago. I wondered how old it might be, and how it might work on my project. It took me several minutes of hunting in the basement to find it, as I always use the cheapo garage sale plane. I'm not sure why I didn't use Dad's. I do remember using it when I was a kid and didn't own my own plane.
Sunday, August 6, 2023
2007 Kubota BX24 Hydrostatic Drive Abrupt Stop in Reverse
Anyone who owns a BX24 (or the "50-series" like BX1850/2350) knows of the issue these tractors had new from the factory regarding the abrupt stop when letting up on the reverse pedal. Mine is no exception. Recently I decided to do more investigating to see if anyone has come up with a solution, as Kubota never did issue a recall. I ran across a guy's posting on the internet that showed that he extended the lever arm that the damping gas strut acts on, which he said did solve the problem. I decided to give it a try. This first photo shows the original arrangement, with the gas strut attaching point being on the rod that runs back to the transmission from the foot pedal.
Tuesday, August 1, 2023
1950 Briggs and Stratton Model 23 9hp Engine from an AgriCat
I went to a garage sale and saw this engine sitting there with a $25 "as-is" price tag on it. Hmm, I can't pass that up now can I. So home it came. The guy selling it said he had the piece of equipment it came out of, an AgriCat mini dozer (the Briggs being replaced with a modern engine). He said this Briggs probably still ran Uh-huh, sure. At least the crankshaft turned over and the engine had compression. What I don't understand is why he would sell the original engine out of a 1950 AgriCat. I'm not complaining by any means, it just doesn't make sense to me.
Monday, July 31, 2023
1986 John Deere 650 Tractor - More Repairs and Updates
A tractor like this that's seen more than its fair share of use and abuse, it's no wonder that there is never a shortage of things to do on it. Take the front loader bucket, for instance. Both sides are bent in at the leading edge. I'm not really sure how that happened but they are needing some help. More precisely, help from an 18" pipe wrench. This first photo is of the right side of the bucket.
Monday, July 24, 2023
1986 John Deere 650 Tractor Repairs and Updates
The engine has been difficult to start after the rebuild (same situation as before the rebuild), and was particularly difficult after the engine had been running for a while. Sometimes it had to set a spell before it decided to start again. I figured the best place to focus on first was injector pump timing. This timing evolution is sometimes called a "spill test". The instructions say to undo the injector lines at the pump, then pull out a "delivery valve" on injector pump #1 outlet, then install a suitable piece of tubing on top of the outlet. At certain points of crankshaft rotation, fuel will flow freely out of the tube since the delivery valve is removed, then at some point of crank rotation the flow will stop. This point is called "beginning of injection". That point should put a timing mark on the crankshaft pulley in line with the timing pointer.
Wednesday, July 12, 2023
1986 John Deere 650 Tractor Reassembly
I'd been waiting a week to get a new pressure plate delivered but it has now arrived. New pressure plate, you ask? Well, yes, the old one is broken and the broken bits are the reason the clutch wouldn't completely release when I first got the tractor home, thus grinding gears when shifting into gear. In the first photo below, the two metal tabs are 2/3 of what is supposed to pull the pressure plate away from the clutch disc when the clutch pedal is pressed down. Without those two tabs, the pressure plate stays somewhat engaged with the clutch disc. So, I had to order a new pressure plate. I didn't realize the broken status until I was installing the clutch and pressure plate onto the rebuilt engine, at which time I noticed something wasn't quite right. This little detour did save me money though, because if I'd purchased the pressure plate from the company I bought the engine gasket kit and parts from, it would have been about $40 more than the $60 I paid for the one I got off eBay.
Thursday, June 29, 2023
1986 John Deere 650 Tractor - New Loader Mounting Pins
Here's a quick post about the pins I made for the loader. I had to drill out the old pins, as they were purt-near welded in place, it seemed. I found a two-foot chunk of 1-1/4" diameter round bar in the basement that I cut two 7-1/2" chunks from.
Sunday, June 25, 2023
1940s Homemade Garden Tractor Gets an Engine and Clutch
I've been busy working on the John Deere 650 lately so I haven't posted much on this homemade tractor. As I'd mentioned previously, I crudely mounted a 1947 Onan BH twin cylinder engine. Since then I permanently attached the engine and made a belt tensioning clutch assembly and belt guard. This first photo is with a trial belt that is too long.
Saturday, June 24, 2023
1986 John Deere 650 Tractor Engine Reassembly
Parts for my engine rebuild came in so it's now a simple matter of putting everything back together, right? First up was to press the new main bearings into the engine block. The front bearing presses directly into the block and the back bearing presses into a flanged casting that then bolts to the back of the block after the crankshaft is installed through the rear of the block. There is a funky center bearing on the crankshaft that is held in place by a large circular split casting. The crankshaft is installed into the block, then the center split casting is bolted to the block with one bolt. The rear bearing and seal flange is then bolted to the block. Here's a photo of the flange when I was removing the bearing: