Monday, July 31, 2023
1986 John Deere 650 Tractor - More Repairs and Updates
A tractor like this that's seen more than its fair share of use and abuse, it's no wonder that there is never a shortage of things to do on it. Take the front loader bucket, for instance. Both sides are bent in at the leading edge. I'm not really sure how that happened but they are needing some help. More precisely, help from an 18" pipe wrench. This first photo is of the right side of the bucket.
Monday, July 24, 2023
1986 John Deere 650 Tractor Repairs and Updates
The engine has been difficult to start after the rebuild (same situation as before the rebuild), and was particularly difficult after the engine had been running for a while. Sometimes it had to set a spell before it decided to start again. I figured the best place to focus on first was injector pump timing. This timing evolution is sometimes called a "spill test". The instructions say to undo the injector lines at the pump, then pull out a "delivery valve" on injector pump #1 outlet, then install a suitable piece of tubing on top of the outlet. At certain points of crankshaft rotation, fuel will flow freely out of the tube since the delivery valve is removed, then at some point of crank rotation the flow will stop. This point is called "beginning of injection". That point should put a timing mark on the crankshaft pulley in line with the timing pointer.

Wednesday, July 12, 2023
1986 John Deere 650 Tractor Reassembly
I'd been waiting a week to get a new pressure plate delivered but it has now arrived. New pressure plate, you ask? Well, yes, the old one is broken and the broken bits are the reason the clutch wouldn't completely release when I first got the tractor home, thus grinding gears when shifting into gear. In the first photo below, the two metal tabs are 2/3 of what is supposed to pull the pressure plate away from the clutch disc when the clutch pedal is pressed down. Without those two tabs, the pressure plate stays somewhat engaged with the clutch disc. So, I had to order a new pressure plate. I didn't realize the broken status until I was installing the clutch and pressure plate onto the rebuilt engine, at which time I noticed something wasn't quite right. This little detour did save me money though, because if I'd purchased the pressure plate from the company I bought the engine gasket kit and parts from, it would have been about $40 more than the $60 I paid for the one I got off eBay.

Thursday, June 29, 2023
1986 John Deere 650 Tractor - New Mounting Pins for Loader
Here's a quick post about the pins I made for the loader. I had to drill out the old pins, as they were purt-near welded in place, it seemed. I found a two-foot chunk of 1-1/4" diameter round bar in the basement that I cut two 7-1/2" chunks from.

Sunday, June 25, 2023
1940s Homemade Garden Tractor Gets an Engine and Clutch
I've been busy working on the John Deere 650 lately so I haven't posted much on this homemade tractor. As I'd mentioned previously, I crudely mounted a 1947 Onan BH twin cylinder engine. Since then I permanently attached the engine and made a belt tensioning clutch assembly and belt guard. This first photo is with a trial belt that is too long.

Saturday, June 24, 2023
1986 John Deere 650 Tractor Engine Reassembly
Parts for my engine rebuild came in so it's now a simple matter of putting everything back together, right? First up was to press the new main bearings into the engine block. The front bearing presses directly into the block and the back bearing presses into a flanged casting that then bolts to the back of the block after the crankshaft is installed through the rear of the block. There is a funky center bearing on the crankshaft that is held in place by a large circular split casting. The crankshaft is installed into the block, then the center split casting is bolted to the block with one bolt. The rear bearing and seal flange is then bolted to the block. Here's a photo of the flange when I was removing the bearing:

Thursday, June 15, 2023
1986 John Deere 650 Tractor Engine Disassembly
This is a Yanmar 2T80UJ two-cylinder diesel engine. Yanmar made the engine (and the tractor) to JD specifications, and I understand it's not identical to any Yanmar-branded engine. Fortunately there are still some aftermarket parts available for these things.
The first step in this engine's disassembly process was to get the engine moved from the motorcycle jack to the engine stand. I took the plastic fan off first, as it already had chunks missing and I didn't want to cause any further damage. I then took the engine stand's main bracket (the black thing that bolts to the engine) off the stand (the red thing) and bolted the bracket onto the back of the engine, then jacked the MC jack all the way up to get the engine as close to the height of the engine stand as possible. I put a blanket over the engine so I didn't get covered in oil when giving it a bear hug to move it, then manhandled the engine from the jack to the stand, fitting the bracket's rear stub pipe into the pipe of the stand. It's one heavy little engine, let me tell you. I'm guessing 200+ pounds. And you may be wondering why I didn't use the engine hoist? It's got the loader hanging from it.

Friday, June 9, 2023
1986 John Deere 650 Tractor Engine Removal
With the loader out of the way, I moved forward with taking out the engine. The first step in engine removal is to remove the front frame and axle. Of course it is. Ok, so the reason is because the engine block is an integral part of the tractor frame. The front frame bolts directly to the engine block, and the engine block is bolted to the clutch housing.
To get the frame disconnected, I first needed to remove the rear support for the loader (another "of course"). The steering arm drag link needed to come free of the front steering knuckle, and wiring for lights (of which there currently aren't any) also needed to be fished out, then seven bolts are removed. I supported the rear half of the tractor with a jack stand, then used a floor jack to balance the front end and roll it away.

Thursday, June 8, 2023
1986 John Deere 650 Tractor Front Loader Removal - 10-hour Job
Yes, I caved and decided to remove the loader (like the service manual says to do, and frankly is required since the front axle and frame come off for engine removal) before going further on engine removal. Removing a loader isn't usually something worthy of writing a blog posting about. It's usually a fairly simple task of removing four pins, unhooking four hydraulic lines, and hoisting the loader off with an engine hoist or something similar. My tractor unfortunately is not simple. Nope. Removing this loader is about as far from simple as you can get without falling off the edge of the earth. The reason? Someone must have lost the two rear bottom pins and decided to make some. Problem was, the pins were made too large for the bushing bores and Big Bubba knocked them in with a 12-pound sledge hammer, I'm guessing. This first photo below is one of the pins. After about an hour of trying to beat one of them out with a 3lb sledge hammer, judicious application of heat from an acetylene torch, and an 18-inch pipe wrench with 2-foot pipe on the end (and getting absolutely nowhere), I decided something drastic was necessary.

Tuesday, May 30, 2023
1986 John Deere 650 Tractor Miscellaneous Repairs and Clutch Issues
Getting a tractor this old that has a modicum of electrical and electronic paraphernalia, it's bound to have been tampered with in the past. This tractor is the epitome of being tampered with. But I digress. The first order of business was to see if a new tachometer drive cable would get the tach working again. No telling how long it's been stuck at 4,906.3 hours. As you can see in the photo, the tach is now working. Not too sure about the hour meter yet.

Saturday, May 27, 2023
1986 John Deere 650 Tractor Transmission Repairs
I got this tractor kind of in pieces. The front and back halves of the tractor were bolted together when I bought it but that was only to help with moving it around. The tractor had to be split apart to put the transmission back together after someone had pulled it apart and abandoned it. This first photo is the tractor shored up in preparation for the split. I figured the front half was rear-heavy but I put the ladder and blocking there just in case I was wrong. Turns out I was correct, it was heavier to the rear of the front axle.

Friday, May 26, 2023
1986 John Deere 650 Tractor 4WD Splined Shaft Repair
Yesterday I decided to try and fix the broken front drive splined shaft on the JD 650. These first two photos show the before and after condition of the shaft.


Thursday, May 25, 2023
1986 John Deere Model 650 Diesel Tractor
Yeah, yeah, I just recently brought home the little bitty homemade tractor, but for some odd reason I couldn't pass this one up. It's part of my affliction of browsing the local online sale venues. This tractor is in need of a bit of work (no, really?), just the way I like them. It's a 1986 John Deere 650 tractor with a two-cylinder diesel engine and front end loader. It's got quite an impressive list of things going on: diesel engine, model 67 front loader, 4-wheel-drive, rear differential lock, 4-speed transmission with hi-lo auxiliary transmission (giving 8 forward speeds and two reverse), power steering, 3-point hitch, PTO. As the below photo shows (kinda), it's not currently running, so the previous owner is pulling it onto my trailer with his tired mini excavator.

Wednesday, May 24, 2023
1940s Homemade Garden Tractor
This little guy followed me home a few weeks ago. It was advertised in the local Craigslist as Yard Art (!). Well, I suppose it is pretty far gone, but that's not going to deter me from trying to get it going. This first photo below shows it in its natural habitat, waiting patiently for someone to come along and give it a little TLC. The lady who owned it said her late husband (Ron) built it on the farm in the Key Peninsula area of Pierce county.

Friday, April 28, 2023
More Wood Turning on the New HF Lathe
So far I'm putting the new/old wood lathe to good use. Ok, maybe not "good" use but it is getting used. I've had the lathe for almost a month. I've made three bowls, a candle holder, a dried flower holder, and two pens. This first photo is the latest, a candle holder. Next to it is a fused glass piece my wife made in her studio.

Monday, April 17, 2023
My First Woodturning Pen Project on the HF Lathe
New tools in the basement usually require new accessories. My new/old Harbor Freight wood lathe is no exception. Just setting up for pen turning required $56 worth of stuff: metric drill bits (yes, I've gone 60+ years without a set of metric drill bits), pen mill barrel trimmer, cyanoacrylate (CA) glue (so-called super glue), and glue activator. And then there's the pen kit. That was another $22 but I opted for a better quality pen.

Saturday, April 15, 2023
Central Machinery (Harbor Freight) Wood Lathe - Making a Spindle Handwheel
I noticed folks online talking about these Harbor Freight lathes not coming with a handwheel on the left side of the headstock spindle. They'd mention that the Jet JWL-1236 lathe had an available handwheel that might fit this HF lathe. After more searching, I did find in one case someone took the chance and actually did buy a Jet handwheel to see if it would work on their HF lathe, which it did. That was back when the handwheels were $33 shipped. Today (2023) that same handwheel is somewhere around $90 to $140, if you can find one. That price is out of the realm of most people buying one just to "see if it fits". Fortunately someone did the legwork back when they were cheaper. This first photo is a stock photo of the Jet handwheel that I grabbed off the net.

Saturday, April 1, 2023
Central Machinery (Harbor Freight) Wood Lathe T34706
Yes, I just got done saying in the last blog that I was keeping the ShopSmith wood lathe. Then this shows up in my basement.....

Tuesday, February 28, 2023
Shopsmith Model 10E Lathe/Tablesaw/Horizontal Borer/Drill Press/Disc Sander 5-in-1 Multi-tool
I purchased this Shopsmith (abbreviated SS) in January of 2020 but I am just now getting around to putting it on my blog. It is in very nice condition and appears to still be wearing its original paint. The motor is a different color but these early machines didn't come standard with a motor. It is an AO Smith motor, which seems to be what most of these older Shopsmiths are outfitted with. The base is a heavy, home-made wood affair with small steel casters. The SS didn't come with a base from the factory, so the new owner would have to make their own.

Monday, February 20, 2023
Pulsar Inverter Generator Hard Starting When Cold
Here's a quick little entry. I picked up this 2kw inverter generator a year ago for a screaming good deal, $279 plus tax and free shipping, from Home Depot. It's a great running generator once I get it started when cold. If it's a cold start though, look out. Get ready for 15 to 30 pulls of the cord before it springs to life. I thought that maybe there's some simple thing that is amiss, and I wondered if the twist knob that actuates the off/run/choke settings is maybe not fully closing the choke. So, off to the great YouTube to see if anyone else might be suffering this same malady. Lo and behold, there was.

Saturday, February 18, 2023
More 1966 Barracuda Post-Paint Reassembly
No, I still haven't gotten around to repairing and painting the trunk lid. Maybe soon... This blog post is to document a few things I did at the end of 2022 and up to now.
First up is a repair of a door armrest. The metal where a sheet metal screw threaded into had rusted away, so I very carefully welded in a piece of metal, being careful to not burn up the 56-year-old foam rubber.

Tuesday, February 14, 2023
2007 Kubota BX24 Little Surprise and Fuel Filter Replacement
A neighbor needed my help with my tractor a couple of weeks ago so I started it up and began the drive. I got 20 feet and the tractor basically died. Hmm, that's never happened before. It was about 30 degrees outside so I wondered if water was in the fuel lines. I first climbed under the tractor to see if the electric fuel pump was working ok. It seemed a little sluggish, so I popped a fuel line off the outlet of the pump and fuel pumped out fine. Next step was to check the fuel filter on the engine. That was an ordeal. In order to get pliers onto the spring clamps on the hoses, the front cowling had to come off. In order to remove the cowling, the hood had to come off. Why, Kubota? Just why? Anyway, after excavating the fuel filter, I pulled the inlet line off and turned the key on to start the pump. Here's what came out:

Saturday, February 4, 2023
2007 Kubota BX24 Plastic Hood And Cowling Crack Repair Using Hot Staple Welding
My Kubota hood was cracked when I bought the tractor in 2017. I finally decided to do something about it and bought a $24 kit on Amazon to do hot staple welding. Below is a photo of the cracked area. It is at the hood latch. Maybe something dropped on the hood and cracked it, who knows.

Thursday, December 29, 2022
Whittling Down Some Small Parts For The Barracuda On The Unimat Lathe
It's not often I have a project small enough to use the Unimat DB200, so when this project presented itself, I took advantage of it. The rocker molding on my 1966 Barracuda uses nylon/plastic "push rivets" to hold the bottom edge of the molding to the car. They are small plastic things that have fingers which are pressed through a hole in the molding, then through a hole in the car's rocker panel, after which the center pin is driven in with a hammer to expand the fingers outward, keeping the rivet in place. A flange on the outer end of the rivets holds the molding flush to the car. Below is a photo showing an original white rivet next to some black ones I found at O-Reilly Auto Parts.

Thursday, December 22, 2022
Tranters Patent Parlor Pistol - Grip Repair
This antique gun has seen better days. Not surprising, given how old it is. My guess is it's circa 1880. In a previous blog, I did some other repairs to this gun, seen here.
Yesterday's task was to repair the left grip that had a chunk of walnut broken out. I'd previously glued a cracked part of the grip together, but the repair done yesterday and today will hopefully get it to look somewhat better.

Monday, November 21, 2022
1930s Harrington & Richardson Trapper .22 Front Sight Repair
I have this old .22 revolver from the early 30's that had a funky replacement barrel on it. I happened to find a old original replacement barrel online so I snapped it up. Upon receiving the barrel, I noticed the front blade sight looked to have been replaced by someone in the long-ago past. I think the sight is supposed to be blued steel, but this sight is made from copper. For all I know, someone flattened a penny back in 1960 and soldered it in when the original broke off. Whoever did the repair really ladled on the solder but it didn't have good adhesion, so it had cracks and gaps in many areas. I didn't get a good photo of it but here are a couple of the best ones I could find, looking through my photos prior to the repair.

Friday, October 28, 2022
1966 Barracuda Post-Paint Reassembly
The long and tedious job of reassembly is next on the to-do list for the 'Cuda. One of the first jobs was to put the windshield back in. I used a new rubber seal. Later in this post I installed the lock strip.

Thursday, October 27, 2022
1966 Barracuda Emblem Paint Refurbishing
The front and rear Fish emblems used to have paint accenting the fish. It's getting quite thin. The top emblem goes on the front grill and the bottom piece goes between the rear glass and the trunk lid.

1966 Barracuda New Paint - Part 2 of 2
The dastardly deed is done. Painting is complete. Well, almost. The trunk lid still needs a lot of work. The rest of the car is painted though. It wasn't without problems. The main problem is that I'm not a good painter. I do it so rarely that I don't know what setting to use if I run into issues, like I did... I attribute it to my using a brand spankin' new Harbor Freight $12 HVLP paint gun and my lack of knowledge. It is what it is... There is massive orange peel and several runs in the paint. And flies. Lots of flies. If there were a million flies outside, there were at least half a million flies inside the closed garage. They must live in there.
Anyway, after doing the underside of the hood and door jambs outside, I installed the doors, then drove the car back into the garage to paint, you know, to get away from the flies....

Monday, October 17, 2022
1966 Barracuda New Paint - Part 1 of 2
I've put off doing the major bodywork on this car for a long, long time. A couple of previous posts from two months ago and had me doing the left front fender (fender) and the left rear quarter panel (quarter panel) of the car. That work was actually done in July of 2018 and February of 2019, respectively, so I didn't get to the right side of the car until four years from the time I did the front fender. Four years to get all the bodywork done shows how much I dislike bodywork. But as I mentioned in a previous post, I wasn't about to hand over $15,000 to a body shop to do the work, and my philosophy is that if I am able to do the work on my old car, I should do it. After all, isn't that what us car guys do, work on our cars?
Well, the long, and sometimes painful, hours of bodywork have paid off. I've actually started painting the car. The Chrysler paint code is RR-1, Yellow (yup, plain ol' Yellow). It's what came on the car from the factory and I wanted to stick with the original color. Here's the first bit of paint on the inner door frames and gas cap:

1966 Barracuda Trunk Lid Repair - Part 1
Time to tackle the trunk lid rust. This trunk lid has less damage than the one that came with the car. Below is the driver's side corner partially complete.

Saturday, August 20, 2022
1966 Barracuda Right Side Body Panel Repairs
(Work actually done 7/20/2021) From a distance, the car didn't look that bad on the right side. Upon closer inspection, there were several areas that needed significant attention. The first being the right rear quarter panel and fender.

1966 Barracuda Front Suspension Strut Rod Bushing Replacement
(Work actually done 7/1/2021) Do these strut rod bushings look ok? Nope, time for new ones.

1966 Barracuda Driver's Side Rear Quarter and Fender Bodywork
(Work actually done 2/27/2019) Time to start work on the rear quarters. Oh, joy. Bodywork is not my forte. But I figure that someone with an old car needs to put in the time to fix up things if they can. Sure I could hire it out but that's not my style if I can do the work myself. And my brother recently told me that when he had the car, he took it to a local well-known body shop (John's Auto Body in Poulsbo) to ask what they would charge to do body and paint. The guy looked the car over and said, "Tell you what, bring me $10,000 and I'll let you know when I need more."

On that note, here's the better of the two rear quarters that needs fixing:

1966 Barracuda Driver's Side Front Fender Repair
(Work actually done 7/12/2018) The fender on the Barracuda needs a little help. It has a boo-boo.

Friday, August 12, 2022
Duncan Model 60 Parking Meter
I picked up this gem a couple of months ago while on a small anniversary celebration trip to Fairhaven, near Bellingham. We were walking around town and came across a small hole in the wall eclectic store that had quite the assortment of "stuff". Amongst the stuff was this parking meter. I've always been intrigued by them, so the $35 asking price sounded very reasonable. Home it came.

Monday, July 25, 2022
Unimat-SL DB-200 Motor/Spindle Bracket Modification
I may have said in the previous post that there would probably be no more projects on this lathe. Well that didn't prove true. I decided to do some whittling on the motor bracket. The reason for this bit of work is because the hunk of steel that encompassed the spindle was way too stiff, and the screw that clamps the bracket to the main spindle needed to be tightened a bunch for the clamping action to do its job. I figured if I removed some metal on the bracket, it would be easier to clamp. Here's what I started with. The red is the main part I planned on cutting out, plus a few minor touch-ups.

Unimat-SL DB-200 Tommy Bars and Marking (Zeroing) Pin
7/4/2022 update:
I did a little fiddling on the lathe today. I made two more Tommy bars. What I started with were two punch blanks that my dad had picked up from somewhere eons (50 years?) ago (or maybe he even made them in school shop, who knows). They had never been hardened, so I used two of them as a starting point.

Thursday, June 30, 2022
Unimat-SL DB-200 Teensy Weensy Micro Mini Lathe
I'm not sure I can call this a real lathe but it was marketed as one. And it does make chips. Very small chips. Someone online said, "it makes steel wool." I now know what they mean. But this lathe wasn't bought to make stuff on a regular basis. I mainly got it because it is so cute and comes in its own little box.

Tuesday, June 14, 2022
1957 Petter Diesel Engine Gets A New Air Cleaner
Prior to buying this engine, I'd called the previous owner and asked him some questions. One was about the air cleaner, or more accurately, about the missing air cleaner in the photos. I asked if he had the air cleaner. He said something to the effect that it does have an air filter but not the original. When I went to buy the engine, the below photo is what I found mounted on the engine. It's the white pleated thing. He said it was a vacuum cleaner filter (!) but it works fine.

Thursday, June 2, 2022
Installing The Choke In The Cushman
Well that didn't go as planned. Yesterday when I made the choke screws, I figured I'd have the choke butterfly installed in a half an hour, tops. What I failed to remember was that not only the choke butterfly and screws were missing, but also a choke rod spring was missing. Ok, so no big deal. I'll just rummage through my small assortment of springs and find one that works. Not so fast, cupcake. I did find a spring that looked like it would work, but upon further inspection, it didn't fit over the choke rod casting. No big deal, I'll just heat up the spring, anneal it, bend it around some, then re-harden it. After two failed attempts, I finally realized it would be faster and easier to just re-shape the spring without all the annealing/hardening business. Fortunately, the spring I'd found was long enough that I could sacrifice two failed attempts and still have enough spring material to make a third one. This first photo shows the finished product and the two failures.

Wednesday, June 1, 2022
Cushman Carburetor Choke Butterfly And Screws
When I got this Cushman, the choke cable had been disconnected from the carburetor. The previous owner said the cable was rusted and stuck, which it was, but he failed to mention to me that the choke butterfly and screws were not in the carburetor. He said he'd been through the carburetor, so he knew the butterfly was missing. No matter, I was sure I could find the missing parts online. Nope. Apparently this Keihin carburetor is maybe specific to this type of engine, I don't know. The engine does start fairly easily without a choke but in the wintertime, I'm sure a choke would be helpful. So what's one to do? Why, make the missing parts, of course. Here's what I had to start with:

Thursday, May 19, 2022
1985 Cushman Turf-Truckster
A couple weeks or so ago another toy followed me home. This one needs some love. Quite a bit actually, as do most things that follow me home. This is a 1985 Cushman Turf-Truckster.

Wednesday, March 16, 2022
1957 Petter AVA1 Diesel Engine "Overload Stop"
If anyone having an older Petter diesel engine has read the starting procedure in the manual, they've no doubt come across something called an Overload Stop. Folks may not understand what this mechanism does. I was one of those folks when I bought my 1948 Gibson D tractor that has a Petter AC1Z diesel engine on it. There was this funky lever that the instructions (and previous owner) said to move down and release. I (and the previous owner) had no idea what it did but I found out later that it is called "Overload Stop". And not until I got this new-to-me AVA1 engine did I realize what the Overload Stop actually does. On the AC1Z engine, the fuel injector pump rack is enclosed so I can't see what is going on, but on this AVA1, the pump and rack are hanging out there for all to see, and the Overload Stop is also right there. Well, if my engine had one, it would be right there, but unfortunately the Overload Stop contraption was missing. Not having anything better to do while recovering from rotator cuff surgery, I decided to make one today on the Smithy mill.

Sunday, March 6, 2022
1957 Petter AVA1 Diesel Engine Welding Broken Cast Iron Pump Gland Clamp
One of the cast iron clamps that seals the Gardner-Denver water pump shaft on the Petter engine's trailer is broken into three pieces and is missing some chunks. Someone had brazed it together in the past and filled in a lot of voids with what looks like JB Weld.

Saturday, March 5, 2022
1957 Petter AVA1 Diesel Engine Loose Flywheel
Ok, it's not as bad as the title sounds, but the flywheel was slowly working itself outward on the crankshaft. Thus the interference with the fan shroud that I'd noticed the first time I started this engine. I had previously spent a day tweaking the shroud around so it didn't scrape on the flywheel and I'd thought to myself that the shroud was sure a close fit to the flywheel, but it didn't dawn on me that the flywheel could be the culprit. Today I started the engine and noticed the rubbing noise again. Hmm, there must be something going on. I then realized the flywheel had moved closer to the shroud. Time to take action.

Wednesday, February 23, 2022
1957 Petter AVA1 Diesel Engine
Another project followed me home recently. And I fully admit I'm a sucker for small (a somewhat relative term in this case), older hand-crank diesel engines. This particular engine is a British Petter model AVA1 single cylinder diesel engine, and dates to approximately 1957. Maybe 1956. Without further ado, here's a photo:

Tuesday, February 15, 2022
Craftsman 313.54403 Oxygen Regulator Leak and Fix
I bought a Sears Craftsman oxy-acetylene welding kit back in the 1970s. For the most part it's worked fine over the years but maybe 15 or 20 years ago the oxygen regulator began leaking such that the low pressure side would slowly creep up in pressure from the set point if the oxygen wasn't being used. A couple of days ago I decided to search the net to see if I could find a rebuild kit for the regulator. In the process I found a site where someone showed where he'd taken the sealing part out of his regulator and sanded it down to make it work again. Kind of. He said that the pressure still slowly crept up, 5 psi in 15 minutes, but that it was better than before, although he didn't say how quickly the creep was prior to the fix.
My regulator did a lot of creeping prior to me fixing it. The gauge went from 25 psi to 45 psi in 1 minute. Whoa. I knew of the issue so I just had to keep an eye on it when I was using it, and had to turn off the oxygen supply if I had to let the thing sit for any length of time. That got to be a pain. Time to take action.

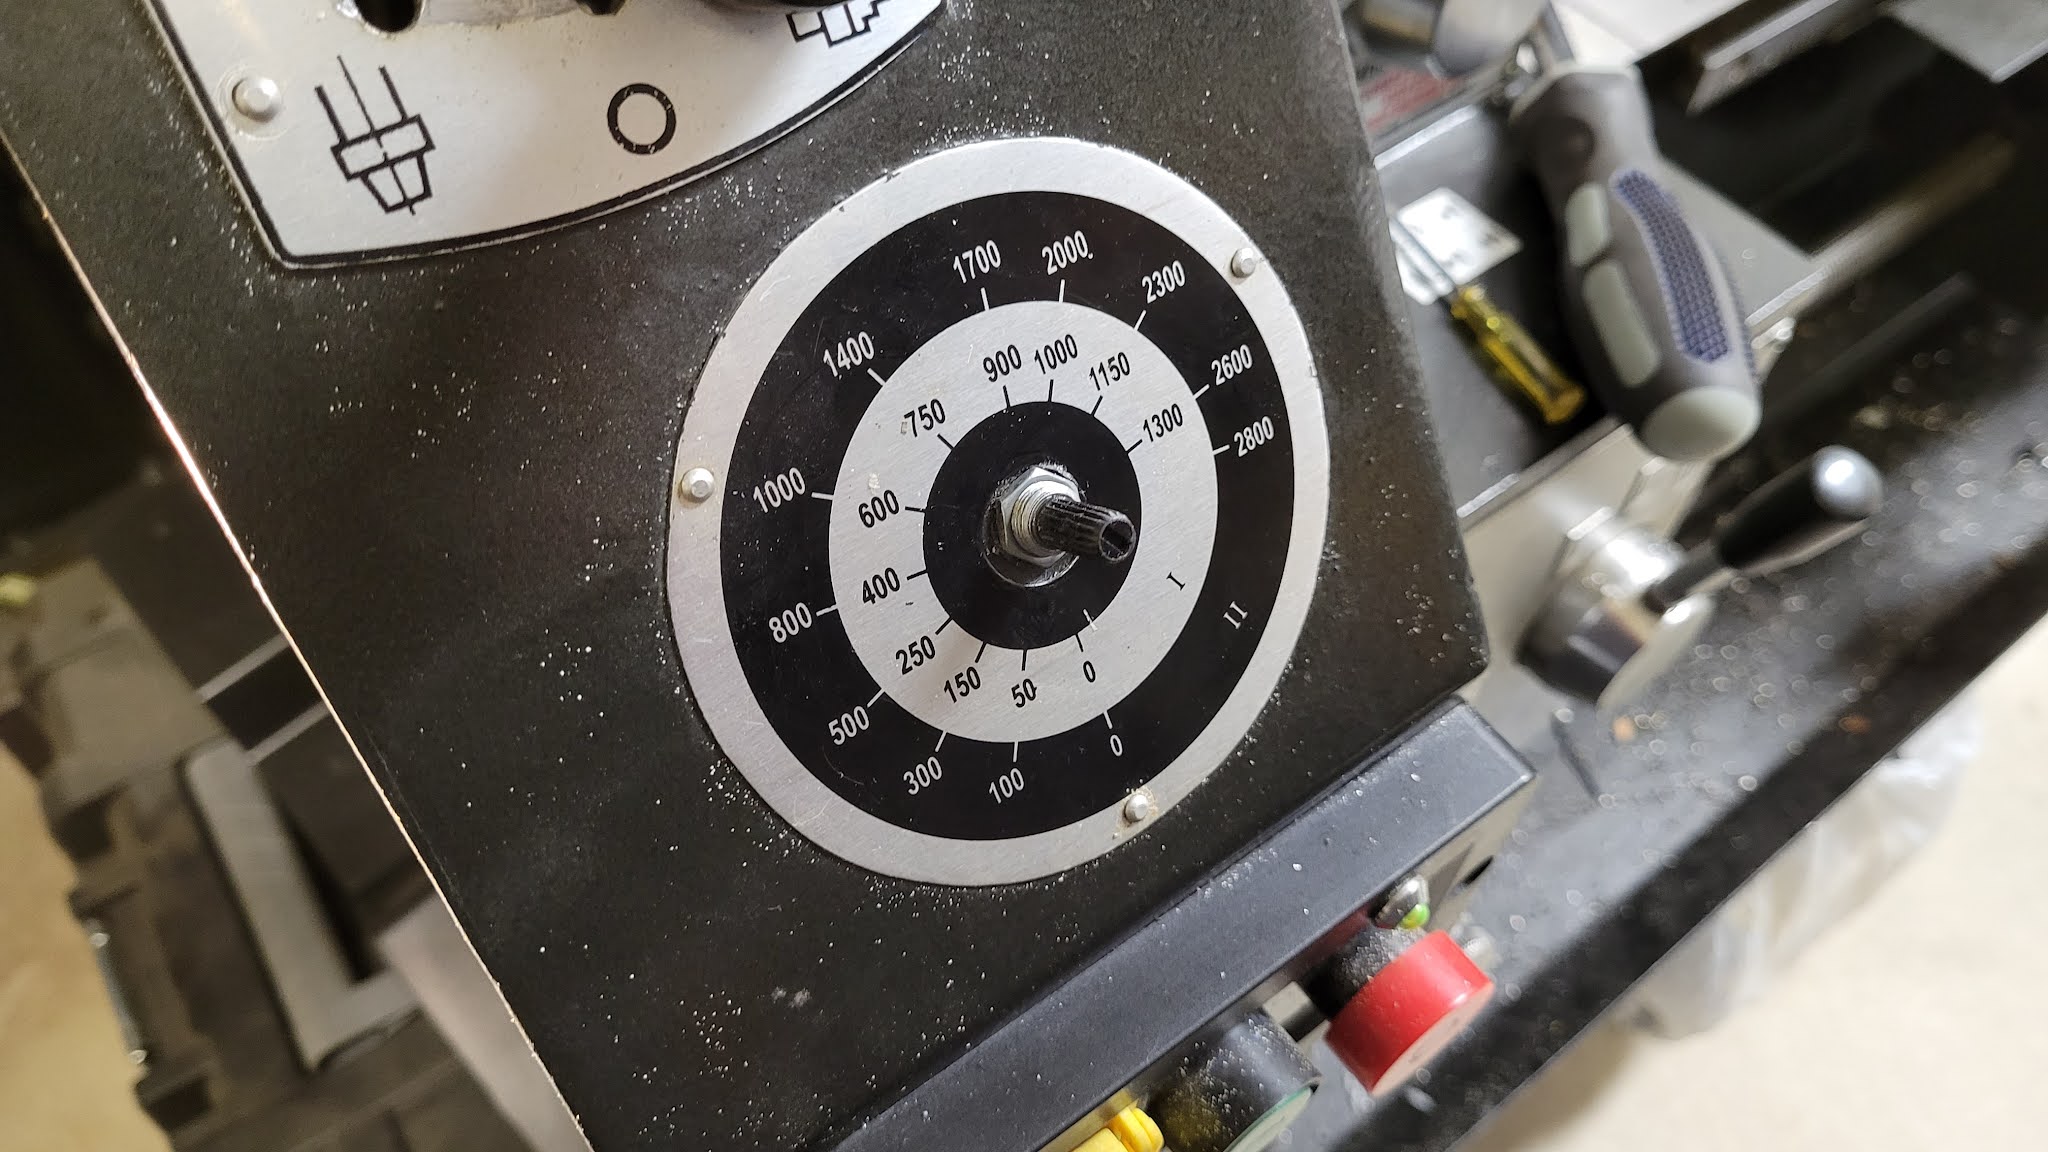
Saturday, November 6, 2021
Smithy Granite I-Max Speed Control Repair
This will be short and sweet. My Smithy lathe/mill has had a flaky speed control potentiometer (pot) for the five years I've owned the machine. Problem is, it's been getting worse. The problem was that when I'd turn the speed control pot to zero, the motor would keep turning slightly, and it would be jerky. I went so far as to contact the company, and they said that I should just use the Stop button every time I want to stop the motor. They did also say a new pot might solve the problem but to still always use the Stop button.
I decided today to see what I could see inside the pot, so I removed it from the machine to take a good look at the innards.